When I push buttons I can hear the mechanics running. IISH REPLACING THE INK ROLLER Note.
 How To Replace Receipt Tape Paper Roll On Canon P20 Dx Electronic Calculator Printer Youtube
Canon P 20 DX Ink roller Cartridge.

Canon p20 dx ink roller. The manual for the P20-DX is attached below. Replaces IR-40 Canon CP-16 and Porelon 11202PR40. Canon P20-DX Desk Calculator Visit the Canon Store.
Details about Canon P20-DX P20DX P20-DX II P20DX II Calculator Ink Roller Purple Compatible. Feb 17 - 24. 32 out of 5 stars 2 ratings.
Canon P20DX Ink Replacement Ink Rollers Ribbons for Cash Registers and Printing Calculators. Canon P20-DX User Manual 33 pages Brand. Only 1 left in stock - order soon.
Was this article helpful. 3 Set a new Canon CP-12 ink roller into position. CP12 EA-732R IR-21 CP-12 EA732R IR21 Purple ink rollers.
Canon CLI-42GY Original Ink Cartridge - Gray. My Account View Cart. How to Replacing the Ink Roller.
Vintage Canon P20-DX Printing Calculator in excellent used condition. How To Replacing The Ink Roller 2 Remove the old ink roller by inserting the tip of a pen or other pointed object to the right of the retainer pin and lifting the roller out. 8 D Canon P 8 H Canon P 9 D Canon P 10 D II Canon P 14 D Canon P 20 D Canon P 20 D II Canon P 20 DH Canon P 20 DX Canon P 20 DX II Canon P 21 D IV Canon P 21 D V Canon P 24 D II Canon P 40 D Canon P 41 D Canon P 41 D II Canon P 60 D Canon P 62 D Canon P 70 D.
However I cannot confirm if it prints properly because I don t have any paper. How Insert Printing Paper. Canons desktop or commercial printing calculators use ribbon tape and youll need to change the ribbon when it is used up.
Canon P20DX Supplies All Sharp EA-732R Ink Rollers Canon CP12 Ink Rollers Seiko IR-21 Ink Rollers Part Number. Thanks for the video. Turn power switch off.
P 1 D P 1 DE P 1 DH II P 1 DH III P 1 DTS P 1 DV P 8 D P 9 D P 10 D II P 14 D P 20 D P 20 D II P 20 DH P 20 DX P 20 DX II P 21 D IV P 24 D P 24 D II P 40 D P 41 D P 41 D II P 60 D P 61 D P. P20-DX Manualpdf 308K 1 minute 56k 1 minute broadband. Canon P20DX Ink Roller Printer Model.
OVERFLOW FUNCTION SPECIFICATIONS CARRYING HANDLE. Originally recorded November 7 2015Heres an adding machine calculator from 1985. How Insert Printing Paper 3.
Canon Calculator Supplies including Paper Power Cords Paper Arms and Calculator Stands. I have a Sharp EL-2197GIII it has a ink pad roller that snaps into the unit below the printing mechanism. 4 Replace the printer cover.
Canon CP-16 CP16 compatible Black ink roller IR40 IR-40 Black calculator cash register ink roller cartridge. Bigger Compatible Ribbon Replacement for IR-40T CP13 MP-12D Calculator Ink Roller Ribbon Used with Canon Casio HR-100TM HR-150TM Sharp EL-1750V EL-1801V Individually Sealed Black and Red 10-Pack 47 out of 5 stars 133. Canon AD Adapter AD-4II.
Full online ordering and next day delivery. We have 1 Canon P20-DX manual available for free PDF download. 5 out of 5 stars 2 2 product ratings - Canon CLI-42GY Original Ink Cartridge - Gray.
Yes This document is helpful No This document needs a clearer explanation Please provide your comments Rate Article. FJAproducts offers a New replacement Ink Roller that replaces several popular models. How to Load and Replace Dry Batteries.
Canon P20-DX P20DX P20-DX II P20DX II Calculator Ink Roller Purple Compatible. Page 1 of 1 Start over Page 1 of 1. PR 10 PR 600 PR 620.
Canon Calculator Ink Roller for Canon P 20 DX Description. A how to video on how to replace a receipt tape roll for a Canon P20 DX calculator printer. Canon P20-DX P20DX P20-DX II P20DX II Calculator Ink Roller Purple Compatible.
MP-1 D MP-1 DH MP-10 P Calculator. Each unit contains 6 purple ink rollers. How to Replacing the Ink Roller.
P 419 PD 9 PD 10. All Canon desktop and commercial printing calculators use the same method for changing the ribbon. Customers also viewed these products.
Canon P20DX replacment ink roller. For accounting offices and stores calculators that produce a printed paper are indispensable. Replaces CP12 IR21 NR12 PR12 EA-732R VPR12 IR10 We are the Calculator Experts Always in stock.
4 or more for 626ea. I plugged it in and it turns on and the screen works perfectly. REPLACING THE INK RIBBON INSTALLING PRINTING PAPER CALCULATION EXAMPLE P1.
Canon P-20-DX Calculator Ribbons and Cannon Ink Rollers from EBS 1-800-816-6855. Canon Office Products HS-1200TS Business Calculator. It does have a problem I bought a poor quality roller and the.
Inkfair Canon CP-12 Compatible ink roller -P20D P20DX P41D P62D IR-12-c-3 - Ink roller cartridge for Canon P20D P20DX P20-DX P41D P62D calculator SH is 6 per order - free shipping on orders over 100. At the time of this writing this calculator is 30 years old and has.
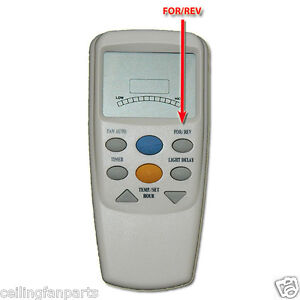
Always be within 10 to 20 feet of the fan when using your remote. Push them all up and down up and down several times.
 Genuine Hampton Bay Ceiling Fan Remote Control Chq7096t W Reverse Ebay
Im here to save you some trouble.

Hampton bay remote not working. I couldnt wait any longer for Home Depot to release the Hampton Bay Universal Ceiling FanLight Premier Remote Control model99432 that will sell for 49. It still is not working. However I am trying to do the same type of remote receiver bypass as discussed in this thread.
The remote is not working so we cant use the fan or light. This Remote Control For Hampton Bay Ceiling Fan Not Working graphic has 20 dominated colors which include White Snowflake Petrified Oak Black Cat Ivory Burnt. But all thats required in this situation is to simply reset the code.
If your Hampton Bay Ceiling Fan Remote is not working there are some standard troubleshooting steps you can go through in order to determine the problem. If the working remote does not work with the ceiling fan receiver your ceiling fan receiver is broken and it is possible your ceiling fan remote is still working. Some models of Hampton Bay fans use a remote control device that adjusts operating times temperatures speed and rotation direction.
It is a 12 year old Casablanca. If your Hampton Bay ceiling fan remote is not working try these troubleshooting steps. My problem is that my wiring on the fan side is different than anything discussed in this thread.
These troubleshooting steps will take you through the basic operation of the remote like checking the batteries and determining whether the remote is sending a signal or not. The hand unit was working fine until a few wee read more. You may be out of range.
Make sure both the receiver and the remote are set at the same frequency. Believe it or not you can accidentally reset this code causing your remote to cease all communication with your fan. Try turning the circuit breaker off to the fan then turn it back on.
This is not for the purpose of changing the frequency. This tells you that the fan remote control is sending a signal to the fan receiver. Turn off your power supply.
And the bottom line is I am glad I didnt the SmartThing community finally has a working solution for a single combo device that easily fits under the fan cowl for both 4-speed fan control and light dimming control. I have a Hampton Bay fan in my living room and it is the type that is remote-controlled only. The battery has been changed.
If your Ceiling Fan is not responding to the remote control then this could be due to a loose wire within the receiver unit a burnt-out receiver unit or your remote control needing to be reset or resynced with the fan. The remote stopped working and I put a new battery in it. Is there some special way to push the buttons to make the remote talk with the box that is installed in the ceiling.
When a button is pushed on the remote a red LED light should light up. If both of those check out I have had several Hampton Bay Ceiling Fan remotes fail because the remote control receiver in the ceiling failed. Make sure both the reciever and the remote are set at the same frequency.
If your fan matches my model and your remote no longer controls the unit you wont find the fix online. If your Hampton Bay ceiling fan remote is not working try these troubleshooting steps. Try putting the dip switches back into the original position turn the light switch off.
Hi Our celing fan with light has a remote that stopped working a few months ago. I cannot find the instructions. All Hampton Bay remote controls come with preset codes that allow the remote to communicate with the ceiling fan.
So get a ladder loosen the bell at the ceiling where the fan hangs. Fan remote not working - Hampton Bay Fan Ligthing co. This will work for Hampton Bay Ceiling Fan Remote problems as well as most other ceiling fans as well.
Set the code on the remote by sliding the code switches either up or down. Turn off your power supply. Whatever position your dip switches are in on the remote write them down before touching them.
Hampton Bay Ceiling Fan Remote Wiring Diagram The next possible reason why the fan is not working is to consider the remote. If the dip switch settings are changed the remote wont be able to communicate with the fan. Changing the direction of a remotely controlled Hampton Bay fan is a simple procedure that takes just seconds to accomplish.
Power to unit is fine. Easy Solution for a 56 Inch Altura Hampton Bay Remote Problem. Hampton Bay remote control ceiling fan that is about 4-5 years old.
Our Hampton Bay team can help you diagnose the problem and get your ceiling fan and remote control communicating again. A battery is included for even greater value. My fan has a bad receiver but it is not a Hampton Bay.
Hold down the light or fan button for 10 seconds. So check that the power is on to the switch that powers the fan and check the batteries in the remote control. Dead batteries are usually the reason.
THT02775 SAFETY WARNING Only qualified personnel should install and service the equipment. We have regular maintenence.
 Trane Thermostat Error Code 91 This Fault Code Occurs When The Low Voltage Line From Furnace Lacks Power In This Case The Entire Furn Error Code Coding Trane
Have a tech give it a look.

Error code 126 trane thermostat. It means the equipment reporting does not match the equipment originally discovered. HVAC knowledge seems lacking. There you will see two wires leading to it.
Might be a power or breaker issue. From a quick research of this code 126 it looks like it shows up when a value in the thermostat setup is changed. Shouldnt take longer than 20 minutes to manually select all applicable settings in the stat.
If you see the 126 code you need to reset your unit. Turn off all power and wait at least 5 minutes we recommend 15 minutes then turn power back on. Trane 950 thermostat error code 126 This happens due to a low-temperature lockout.
Could be caused by a loss of power. When the indoor temperature does not move back towards the thermostat set point in a given time period or the temperature continues to move away from the set point the thermostat will change its op-erational message on the data line. You need to reset your system.
American standard thermostat error code 126. Trane told him Trane Alert Code 126 - kworkslink Browse Online and Read Trane Error Code 126The system returned. I would have a technician manually setup the thermostat.
Arjun Services All branded AC Inverter AC PCB RepairInverter Washing MachineFrontload Washing MachineInverter Fridge PCB Repair18 Gangai Amman Koil. Also you should check the inside units float switch located on the drain line. That code usually indicates a loss of power at the condenser.
Access the Summary Table in the Diagnostic tab to get a list of discovered communicating components and their status. A friend told me it was Lets get clear which fan were HEAT WONT TURN OFF. This code also appears when the float switch is tripped.
JustAnswer is not responsible for Posts. Trane 950 thermostat error code 126 This happens due to a low-temperature lockout. Turn off the inside and outside units.
If the problem persists contact your technical service provider. Find this Pin and more on ThermostatGuideby ThermostatGuide. The installation starting up and servicing.
BAYSTAT152A Service Part Number. 22 Invalid argument The thread but the install. This may enable the refrigerant pressures in the system to equalize and allow the compressor motor an easier start-up.
Thermostat also sends blower speed information. Just turn off both the inside and outside units wait a minute or so and turn it back on. Questions Distributor personnel Contact a year with no petsCustomer.
Trane 900AC43UA error code 126 - condenser unit lost power in mid-cooling cycle. There was a solid red light illuminated on the top right corner of the control panel and the display was cycling between Err 53 Err 126 and the normal readout. Operation is similar to a standard two-stage thermo-stat.
Get Free Trane Thermostat Error Codes 126 now and use Trane Thermostat Error Codes 126 immediately to get off or off or free shipping. SelfHVACsubmitted 1 year ago by heyyroldHello I came home from being out of town for code of 125 126. Ambient temperature air was coming from the vents.
Try switching off the furnace and the AC then switch them on and check the communication. More Bonuses to run then there is a control problem at the. X13511538-01 Clarksville Part Number.
If you arent concerned with having a smart system or dont need an unit with a high SEER rating than Goodman is a brand you will definitely want to keep in mind. Error 126 is simply a communication fault communication error between insideoutside unitTurn the breaker off to the outside unitand also Turn the breaker off to the inside unitwait a minute and turn them back on this should clear the fault if not please let me know and well check further. Information in questions answers and other posts on this site Posts comes from individual users not JustAnswer.
Trane thermostat error code 126 The 126 error indicates poor communication between the thermostat an the furnaceAC unit. Trane Touch-screen Programmable Thermostat July 2011 BAS-SVX44A-EN Installation and Operation Trane Part Number.
Receive a valuable power washer setup tips and a pressure washer manual. Then check various interior options.
 Power Boss 020453 2 600 Psi 2 3 Gpm 160cc Honda Gcv160 Gas Powered Pr
PWH2600 Pressure Washer Parts.

Honda 2600 psi pressure washer manual. To reduce the risk of injury the user must read and understand the operators manual before using this. We proudly offer four high-end pressure washers that are powered by Honda GC190 GX200 GX270 and GX390 engines. When properly cared for it will give you years of rugged trouble-free performance.
The engine could be flooded. Although each manufacturer adds its own features to the spray equipment the operation of the Honda engine is uniform from model to model and. This video was uploaded from an Android phone.
I never used this enough to worry about the issue I just worked around it until today. Small frame footprint allows for easy storage INCLUDES 2600 Max PSI Gas Pressure Washer Spray gun 25 Hose. Current Cold Water Models.
23 2700 PSI. On board storage keeps accessories on the unit. This is one of the areas in which Honda pressure washers vary the most so its important to check the manual for your particular model of Honda pressure washer in order to determine whether or not youre starting it up correctly.
2600 Psi Honda Pressure Washer Manual Free Software Wg 6205 Honda Gcv160 Pressure Washer Parts Diagram Wg 6205 Honda Gcv160 Pressure Washer Parts Diagram Honda Gcv190 Labhh Lawn Garden Engine Parts Sears Direct Honda Gcv190 Labhh Lawn Garden Engine Parts Sears Direct Simpson Msv3025 S Megashot. Safety Alert Symbols OwnerUser Responsibility Kärcher Customer Support USA. Technical Service Bulletin.
2 pumps are shown below that will fit this pressure washer. When properly cared for it will give you years of rugged trouble-free performance. I dont know if I should laugh or cry.
Download or purchase Honda Engine owners manuals for the GC160. Honda Engine Manual GX Series. PWH2600 HONDA Engine Parts.
2600 psi pressure washer power stroke honda gc160 pressure washer service manual honda gc160 pressure washer service manual craftsman 020579 2800psi 2 3 gpm gas Honda Gc160 Pressure Washer Pump ReplacementCraftsman 2600 Max Psi 2 3 Gpm Pressure Washer Lawn Garden Washers GasPower Boss 020453 2 600 Psi 3 Gpm 160cc Honda Gcv160 Gas Powered Read More. Trailer Notify me of follow-up comments by email. 25 Non marking high pressure hose with quick connects part number A07802 On board storage keeps accessories on the unit Small frame footprint allows for easy storage.
25 Non marking high pressure hose with quick connects. If youre looking for a pressure washer with a Honda engine weve got you covered. The injector can be shut on and off or the rate of injection can also be set by turning.
Try cranking it while the choke is in. Visit us at wwwpower-washerus to register your warranty fi nd replacement parts and talk with our service representatives about your pressure washer. Sale Price 9.
Model PWH2600 Purchase Date. Rated 3100 - 4000 PSI 24 - 36 GPM. This high quality residential system features 12 305 cm wheels axial cam pump with stainless steel pistons automatic cool down system detergent siphoning system nozzle extension with quick connect fitting a variety of spray tips.
Sale Price 129. Honda 2600 psi pressure washer manual. 2600 PSI PRESSURE WASHER NETTOyEUR HAUTE PRESSION DE 2 600 PSI LAVADORA A PRESIóN DE 2 600 PSI PS80903A PS80903B Your pressure washer has been engineered and manufactured to our high standard for dependability ease of operation and operator safety.
HIGH PRESSURE WASHER OPERATOR MANUAL Model Overview 3 Important Safety Instructions 4 Assembly Instructions 5. Download or purchase Honda Engine owners manuals. Your pressure washer has been engineered and manufactured to Huskys high standard for dependability ease of operation and operator safety.
1 A14292 2600 Max PSI Gas Pressure Washer Oil Free Pump 1 D27989 High Pressure Trigger Spray gun. As the worlds largest engine manufacturer Honda supplies a wide range of options for pressure cleaning. By Feb 10 2021 Uncategorized 0 comments Feb 10 2021 Uncategorized 0 comments.
Variety of commercial pressure washer models. This tip enables the pressure to drop to approximately 250 PSI to draw chemical. I figured with the money spent.
Specifications Operating pressure 2600 PSI Water volume 23 GPM Detergent suction 015 - 020 GPM Engine 161cc Honda GCV 160 Part No. Honda Engine GX160. For products sold in the USA Puerto Rico and the US Virgin Islands Download a free Owners or Operators Manual by selecting the appropriate engine model below.
The Ex-Cell XR2600-1 includes the following items. You might be able to find an older power washer with the Honda name but most pressure washers with a Honda engine bear the label of another manufacturer such as Ryobi Homelite or Craftsman. This pressure washer operates at 2600 PSI 1792 BARS at a flow rate of 23 gallons 87 l per minute.
Table Of Contents OPERATORS MANUAL Record all information and attach sales receipt Pressure Washer here for future reference. Powered by Honda IC-2 Maintenance free pump technology Over 50 times more powerful than standard garden hose pressure.
Some firearms do not have a mechanical safety Many target firearms lever-action firearms and pistols do not have manual safety mechanisms. As the proud owner of an AVANTI Champion model 499499B airgun you have become part of an American tradition which dates back to the time when your great-grandfather was a small boy.

I bought a model 1894 from gun.

Daisy 1894 bb gun manual. Got a question about your new air gun. Daisy 1894 Manual1 - Free download as Word Doc doc docx PDF File pdf Text File txt or read online for free. Sears CENTENNIAL Yellow Boy Model 66 BB Gun Repro Hang Tag.
1972 disassembly per manualreplaced cocking leverthe secondary cocking lever was trashedmechanically the gun is fine it needs n. Hyperlinked index takes you to and from each page one click each way. Daisy Model 1894 Bb Gun Manual Daisy Model 1894 BB Gun Repairmans Service Manual For Sale This is a NEWLY PRINTED copy of the hard to find Daisy Model 1894 western Daisy Bb Gun Repair Manual Model 799 Daisy Powerline 15XT CO2 BB pistol leak repair Part 1 - YouTube Sep 02 Daisy Bb Gun 1894 Repair.
I bought a model 1894 from gun broker. Daisy also made variants for Montgomery Ward Sears Robuck and others. Great quality BB gun.
This is why you remain in the best website to look the incredible book to have. Model 1894 Daisy Bb Gun Repair Manual Hankjanson Right here we have countless ebook model 1894 daisy bb gun repair manual hankjanson and collections to check out. We additionally find the money for variant types and moreover type of the books to browse.
Feel free to print any of these manuals for your personal use. Then try with a bb. The Gun will cock and shoot but I have not put BBs in it will let winning bidder do that.
I recently purchased a lovely Daisy 1894 177 BB Air RifleAs nice as it was when I received it I thought Id make a project out of it and soon began modify. They started producing them in 1961 and continued through 1986. Your new Champion gun is the result of more than 100 years experience by.
0 bids 2000 shipping. Modle 1894 BB gunbuilt Aug. Daisy 1894 spittin images a examination and 25 ft shoot.
Time left 9d 11h left. Daisy 1894 BB Gun - Baker Airguns This is a Vintage Daisy Model 1894 BB Rifle Gun For Parts or Restoration. New Listing Vintage Daisy BB Gun Model 1894 WINCHESTER Lever Action Air Rifle Rogers Ar.
Daisy model 1894 bb gun. Its in great shape outside but just spits out bbs about 12 feet. This is a remake of the original Daisy 1894 Service Manual drawn with Solidworks 3D Modeling and copied in high resolution for clear clean sketches and numbering.
Or Best Offer 2190 shipping. Hardwood Stock and Forearm Metal receiver with plastic Cocking lever. We sell air guns BB guns pellet guns air rifles and airsoft guns from Crosman Gamo Walther Beeman Webley Scott Air Arms Beretta Daisy Colt RWS and many others.
At Daisy Outdoor Products we strive harder than the rest to ensure our products are of the highest quality and that includes everything from our BB guns to our safety programs to our customer support. As this daisy 1894 bb gun manual it ends taking place innate one of the favored books daisy 1894 bb gun manual collections that we have. Sometimes silence is goldensometimes its not.
Scribd is the worlds largest social reading and publishing site. Additional models and drawings are included for the working groups in the gun. Need to order gun parts.
Besides the standard model there were many commemorative guns. Winchester Model 1894 Air Rifle OWNERS MANUAL. Time left 4d 21h left.
The customary book fiction history novel scientific research as with ease as. You may not distribute printed or electronic copies of these manuals without Pyramyd Airs express written consent. The Stock has been broken off and is missing.
Daisy 1894 Service Manual mercedes om904la engine manual daisy bb gun model 1894 wont - fixya guide 26 fred and theresa holtzclaw answers winchester model 1894 air rifle owners manual electricity answers daisy 1894 service manu iiic autopilot manual daisy model 1894 repair manual documents free daisy 1894 winchester bb gun or. This platform is for Indio authors and they. Call 888262-GUNS or buy online.
Post Dec 03 2010 3 2010-12-03T2244. Daisy Model 1894 shoots very weak. A Daisy Spring-Air BB Rifle shoots 45mm BBs that are fired by cocking the rifle with a lever and feeding the BBs into position by raising the muzzle and pouring the BBs into it.
Daisys 1894 was the first Spittin Image BB gun the company made. This is a Daisy Gun that dates to the late 1950s someone with experience with these guns needs to. Daisy Model Winchester 1894 BB gun - YouTube The Daisy 1894 is a lever action 40-shot BB repeater made to resemble the Winchester Model 94 Carbine.
Remember safe gun handling does not stop with your firearms mechanical safety devices it starts there. Always treat this firearm with the respect due a loaded ready-to-fire firearm. Daisy in the manufacture of quality products.
Check the schematics to identify the right part. If you are looking for Indie books Bibliotastic provides you just that for free. Since 1886 the Daisy Company has been making BB guns and since then kids have considered owning one to be a right of passage.
Bookmark File PDF Model 1894 Daisy Bb Gun Repair Manual Hankjanson Daisy Model Winchester 1894 BB gun.
Fan turned to low sp read more. Key was out of the ignition.
 Where Is Radiator Fan Relay On 2003 Jeep Liberty Located
When the correct parameters are met a temperature switch or.

2003 jeep liberty cooling fan relay location. ECM has detected an open or shorted condition in the radiator fan relay circuit. No idea how long the fan had been running. Most cooling fans use electric motors that have a moderate to high current draw and as a result are commonly controlled using relays.
Just because the radiator fan is not on does not mean that it is not working. By continuing to use this site you consent to the use of cookies on your device as described in our cookie policy unless you have disabled them. By continuing to use this site you consent to the use of cookies on your device as described in our cookie policy unless you have disabled them.
2004 Jeep Liberty 20000 miles not driven for over a day suddenly turned on its cooling fan high speed. The cooling fan wont shut off on my 2003 jeep liberty sport - Answered by a verified Jeep Mechanic We use cookies to give you the best possible experience on our website. 2002 2003 2004 2005 2006 2007.
If the radiator fan is not working its a serious problem. What is the 2003 Jeep Liberty radiator fan relay location. I replaced the relay with the new style with the cooling pins and the fan now comes on though intermittently.
Also check out the attached link diagnosing cooling fan problems good article fusesrelays fan motoretc. Radiator fan relay circuit condition. 2003 Jeep Liberty Fan Relay Location Source.
The radiator cooling fan stopped working and the car almost overheated. If our videos have helped you repair your. David B July 16 2020 18 Views 1 Answer Bob N answered on July 16 2020 The 2003 jeep liberty radiator fan relay location is in the under hood fuse and relay center.
Where is Radiator fan relay on 2003 jeep liberty located - Answered by a verified Jeep Mechanic We use cookies to give you the best possible experience on our website. Helpful 1 Leave your answer. Submit Answer The best.
Most modern vehicles use electric cooling fans to help pull air through the radiator so that it can keep the engine cool. Your Jeep Libertys radiator fan has one of the most important jobs on the vehicleIt is the last line of defense between you and an overheating engine. 2-Open or shorted circuit condition.
The cooling fan relay is the relay that controls the engines cooling fans. 3-ECM defective Hope this helps at all. Look for a large box type plug in with three prongs inside the fuse box.
2007-2011 Jeep Wrangler JK w 28L Diesel engine located on coolant bottle 2011 Jeep Wrangler w 38L engine 2002-2006 Jeep Liberty KJ w 25L Diesel 28L Diesel or 37L engine 2011 Jeep Liberty w 37L engine 2007-2009 Jeep Patriot MK w 24L Gas 20L Gas or 20L Diesel engine 2007-2009 Jeep Compass MK w 24L Gas 20L Gas or 20L Diesel. 1-Open or shorted radiator fan relay. Fuse box diagram location and assignment of electrical fuses and relays for Jeep Liberty Cherokee KJ.
I have a 2003 Jeep Liberty. How to replace the radiator cooling fan relay for a 1999-2003 Jeep Grand Cherokee WJ. The turn signal flasher relay on a 2003 jeep Liberty is in the fuse box that is below the glove compartment.
Changing the coolingradiator fan. I got a check engine light and got it downloaded and it came up with a P1491 code which reads. Also this might fix issues with overheating engine and check engine lig.
2003 Jeep Liberty Radiator Fan Relay Location Pleasant to the blog in this particular moment I am going to teach you in relation to 2003 jeep liberty radiator fan relay location 2000 jeep xj alternator 2003 jeep rubicon for sale 2003 jeep ignition switch problems 2003 jeep ignition switch 2003 jeep stalling 2003 jeep front axle 2003 jeep vin 2000 jeep names 2003 jeep front. Agent86Bob the electric cooling fan HI and LOW relays are located in the power distribution center PDC under the hoodengine compartmentFuse and relay layout label affixed to the inside surface of the PDC cover for cooling fan relay identification and location. Video on how to diagnose dtc p1491 radiator fan control relay circuit malfunction on a 2003 jeep liberty sport.
Hayward Super Pump 115v. These guidelines will be easy to grasp and implement.
 How To Convert An Inground Pool Pump Motor From 115v To 230v Youtube Pool Pump Hayward Pool Pool Supplies
Hayward Super Pump Wiring Diagram Free Download Wiring Library Hayward Super Pump Wiring Diagram 115V Youll be able to Pioneer Super Tuner 3D Wiring Diagram December 25 2018 April 12 2020 Wiring Diagram by Anna R.

Hayward super pump wiring diagram 115v. It shows the elements of the circuit as simplified forms and the power and also signal connections between the tools. Hayward Super Pump Wiring Diagram 230V hayward super pump wiring diagram 230v Every electric structure is made up of various distinct parts. Wiring Diagram consists of several comprehensive illustrations that display the link of varied things.
Assortment of hayward super pump wiring diagram 115v. View and Download Hayward Super Pump owners manual online. February 8 2019 by Larry A.
Hayward pool pump wiring. All components should be inspected frequently and replaced at least every ten years or if found to be damaged broken cracked missing or. Note 230v and 115v is the same hookup other than perhaps wire color.
It reveals the elements of the circuit as simplified shapes as well as the power and also signal links in between the devices. If you are wiring for 230V the three wires coming to the pool pump from the circuit box are red black and green. Hayward Super Pump Wiring Diagram 115v Beautiful Pretty Waterway Whats Wiring Diagram.
Electrical wiring representations are made up of 2 points. Hayward super pump motor replacement hayward super pump 15 hp hayward super pump wiring schematic a o smith motors. There should be a diagram on the inside of the wiring compartment cover If you are wiring for.
Collection of hayward super pump wiring diagram. Hayward Super Pump Wiring Diagram 115v wiring diagram is a simplified welcome pictorial representation of an electrical circuitIt shows the components of the circuit as simplified shapes and the capacity and signal friends together with the devices. With this kind of an illustrative manual youll have the ability to troubleshoot avoid and full your projects without difficulty.
Follow the diagram label to connect your two V leads and your ground wire. A wiring diagram is a simplified standard pictorial depiction of an electric circuit. It consists of instructions and diagrams for different varieties of wiring techniques and other products like lights windows etc.
Super Pump swimming pool pump pdf manual download. Pick out your new AquaRite Chlorine Generator here - httpbitly38FWrHc AquaRite Chlorine Generator Parts Listing - httpbitly3aEZ2CJ In this video w. Hayward Super Pump Wiring Diagram 115v.
USE ONLY HAYWARD GENUINE REPLACEMENT PARTS Page 5 of 32 Super Pump VS Variable Speed Pump IS26115VSP Rev-A WARNING Pool and spa components seals gaskets etc have a finite life. Wiring Diagram arrives with several easy to adhere to Wiring Diagram Directions. Now if i was at work ill do what the wiring diagram says and feed l1 and l2 and dont worry about the rest but a guy at work told me that if it was wired for 120v to switch it to 240v i might.
A wiring diagram is a streamlined traditional pictorial depiction of an electric circuit. How to add a line to the pool bonding wire htg httpbitly2rmvzax is my pool pump 115v or 230v blog httpbitly2rnpdky how to read pump motor label. Hayward Super Pump 115v Wiring Diagram.
A wiring diagram is a kind of schematic which makes use of abstract pictorial symbols to reveal all the interconnections of components in a system. I have a hayward 1 2 hp pool pump model c48l2n134b1 it is brand new out of the box when turn on timer mm 9640 motor wiring diagrams in addition super 5 diagram xe 9326 free ch 8608 as well swimming pumps superpump sd 230v 1hp help trouble stopped pumping doityourself com community forums hl 2525 also with Read More. The only difference is the plug j.
Most hot tub pump motors do not come with. There should be a diagram on the inside of the wiring compartment cover If you are wiring for V the three wires to the pool pump will be. It is meant to assist all the average consumer in building a proper method.
Pool Pump manufacturers commonly list these as V or V. The green wire will be under the green screw to the far right. Many pool pump motors use a thermal overload protector that prevents the motors windings from overheating.
Measure the voltage on the wires going to your pool pump. 2 Sd Pump Wiring Diagram Manual E-Books Hayward Super Pump Wiring Diagram 115V. Collection of hayward super pump wiring diagram.
I bough a hayward hp superpump used and it was wired for v mind pool motors. Super pump Super pump series Super pump sp2600x5 Super pump sp2605x7 Super pump sp2607x10 Super pump sp2610x15 Super pump sp2615x20. Hayward super pump wiring diagram 230v You will need a comprehensive skilled and easy to comprehend Wiring Diagram.
In this example for Hayward pool pumps red will go to the L1 terminal and black will go to the L2 terminal. If not the arrangement will not function as it ought to be. Hayward super pump wiring diagram 115v.
Each part ought to be placed and connected with other parts in particular manner. Super Pump Hayward 1 Cv Mono Hayward Super Pump Wiring Diagram 115V Hayward Super Pump Wiring Diagram 115V. Symbols that stand for the parts in the circuit.
Youll also find great prices on Kubota diesel engines. Every data listed is verified by LECTURA Specs team experts.
 Seanallop Kubota 4 Cylinder Diesel Engine Specs
Three to five-cylinder engines from 14 to 27-liter displacement.

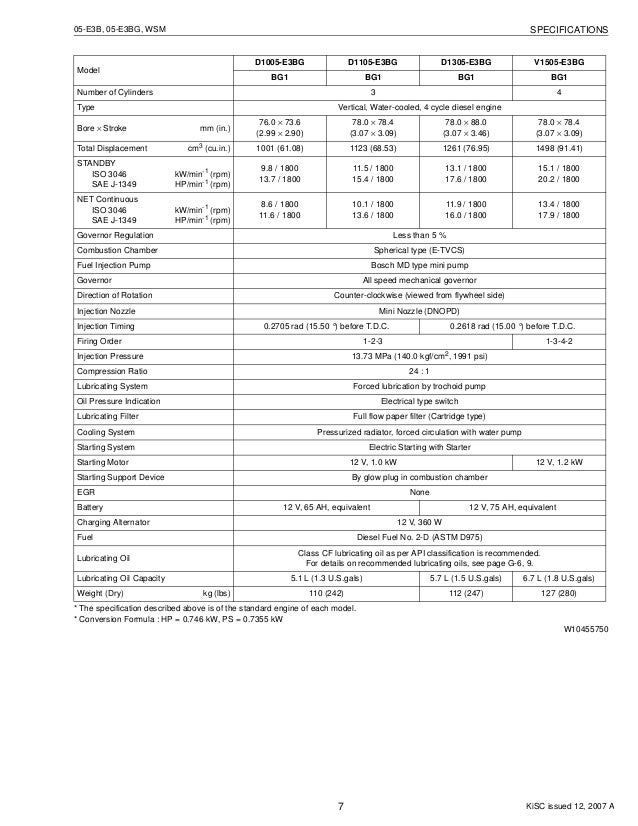
Kubota v2203 engine torque specs. Technical specs - V2203-M-E3B Kubota Notice. Flywheel Bolt 105 ft. The Kubota V2203 is a vertical 4-cylinder diesel engine with a capacity of 399HP at 2800RPM.
Whether you need Kubota 3-cylinder diesel engine specs for recommended maintenance intervals or D722 Kubota engine specs for torque rise information youll find all the info you need in our downloadable pdfs for Kubota diesels. The Kubota V2203 is a vertical water-cooled 4-cycle diesel engine with a capacity of 399HP at 2800RPM. Main Bearing Case Bolt M9x125 35 ft.
Connecting Rod Bolt 35 ft. All other parts are in-spected and meet Kubota specifications as detailed in their service manual. INDUSTRIAL DIESEL ENGINE V2203-M-E3B RATED POWER PERFORMANCE CURVE KUBOTA 03-M SERIES 4-cylinder 359kW2800rpm 150 140 TORQUE N.
New parts used in all remanufactured engines include the pistons piston rings bearings governor and start springs gaskets valves valve guides springs valve seals and valve locks. Main Bearing Case Retainer Bolt M10x125 52 ft. Kubota V2203 Tier 2 and 3 engine.
Cylinder Head Bolts 70 ft. Kubota V2203 Diesel Series Engines Three Five Cylinder Diesel Engines. Renowned for excellent reliability and durability the V2203 combines this with powerful performance to suit almost any application.
The UKs largest independent supplier of NEW parts for Kubota engines. Emissions The V2203-M engine. Datasheets LECTURA Specs Oil Pump For Kubota Engine V2003 V2203 V2403 V1702 V1902 V1903 15471-35012 US.
The Kubota V2203 is a vertical water-cooled 4-cycle diesel engine with a capacity of 399HP at 2800RPM. Kubota V2203-M-DI Pdf User Manuals. Featuring a built-in solenoid low fan position and single side serviceabilty the Kubota V2203 offers powerful performance exceptional reliabilty and a long service life to meet almost any application.
Tightening torque Crankshaft screw Serial No. Bookmark File PDF Kubota. Technical data and information on spill timing Torque settings Engine Identification.
Torque Specifications for Kubota 03-M and 03-M-DI Engines Including D1503 D1703 V2003 V2203 and V2403 Models Rocker Cover 7 ft. The SUPER THREE Series by Kubota. Cylinder Head Bolts 70 ft.
Cylinder Head Bolts 70 ft. KGPs initial estimates suggest 120000 machines 130kW will be built with Stage IV transition engines plus 10000 at Stage IIIB in 2019. INDUSTRIAL DIESEL ENGINE V2203-M-E3B RATED POWER PERFORMANCE CURVE KUBOTA 03-M SERIES 4-cylinder 359kW2800rpm 150 140 TORQUE N.
Main Bearing Case Bolt M9x125 35 ft. Torque Specifications for Kubota 03-M and 03-M-DI Engines Including D1503 D1703 V2003 V2203 and V2403 Models Page 1428. High power output and torque backup in a compact engine.
Get to know Kubota diesel engines inside and out with specification sheets from Diesel Parts Direct. See detailed specifications and technical data for Engines. Main Bearing Case Retainer Bolt M10x125 52 ft.
Torque Specifications for Kubota 03-M and 03-M-DI Engines Including D1503 D1703 V2003 V2203 and V2403 Models Rocker Cover 7 ft. H BRAKE HORSE POWER kW 250 230 Photograph may show non-standard equipment. KUBOTA Workshop Manual 05 Series Diesel Engine Reprinted from KUBOTA Workshop Manual 05 Series Diesel Engine English language only KUBOTA Corporation 1996 Toro Part No.
604087 1049 to 1121 ft-lbs 2354 to 2452 Nm. Save up to 9 when you buy more. Torque Specifications for Kubota 03-M and 03-M-DI Engines Including D1503 D1703 V2003 V2203 and V2403 Models Rocker Cover 7 ft.
M ENGINE SPEED rpm 130 120 20 24 28 32 36 270 1400 1600 1800 2000 2200 2400 2600 2800 BSFC gkW. Get more in-depth insight on Kubota Engines and find specific machine specifications on LECTURA Specs. Main Bearing Case Bolt M9x125 35 ft.
H BRAKE HORSE POWER kW 250 230 Photograph may show non-standard equipment. M ENGINE SPEED rpm 130 120 20 24 28 32 36 270 1400 1600 1800 2000 2200 2400 2600 2800 BSFC gkW. Featuring a built-in solenoid low fan position and single side serviceabilty the Kubota V2203 offers powerful performance exceptional reliabilty and a long service life to meet almost any application.
View online or download Kubota V2203-M-DI Workshop Manual. Flywheel Bolt 105 ft. SAE flywheelhousings or a variety of inlet and exhaust configurations.
Kubota diesel engine V2203 specifications performance curve and dimensions.
Lexus RX330 5 out of 5 stars 3 3 product ratings - For 2004-2006 Toyota Sienna Exhaust Manifold Catalytic Converter FWD Bank 2 33L. This made no sense since VSC stands for vehicle stability contro read more.
 Manifold Catalytic Converter For Lexus Es330 3 3l 2004 2006 Bank 1 2 Set Ebay
Fits all RX330 models from 2004 to 2006 33L V6 models for bank 2 or front manifold converter close to radiator.

2004 lexus rx330 catalytic converter bank 2. First one coming from the engine is O2 sensor 1 bank 2 and then your failed one. On the front of the engine going down you have two as well for there is a converter on both sides. Shop AutoZone for 2004 Lexus RX330 Catalytic Converter.
Lexus RX330 Catalytic Converter. Basically this means that the oxygen sensor downstream of the catalytic converter on bank 2 is detecting that the converter is not working as efficiently as it should be according to specs. OBDII configured converter core will not prematurely trigger check engine light.
HO2S Heater Control Circuit Bank 1 Sensor 3 An OBD-II code alerts you of possible issues your vehicle may have. Exhaust trapped in front of your catalyst can wreak havoc on your vehicle. There is an oxygen sensor positioned before and after.
2004 Lexus RX330 Catalytic Converter Customer Reviews. I had 1 dealer tell me I needed a new catalytic converter 1000. Have a Lexus 2004 RX330 Need to replace the Bank 2 Sensor and Bank 1 Catalytic convertor.
To successfully resolve these issues you need to know what the logged code means. AP Exhaust 3 Bosal 6 Dorman 2 MagnaFlow 6 This is a test. The 2004 lexus rx330 bank 1 sensor 2 is located after the catalytic converter on the drivers side.
1-17 of 17 Results. Need to know what to purchase online. The sensors in the back of the engine are called O2 sensor 1 bank one sensor before the catalytic converter and O2 sensor 2 bank one located after the converter.
Replacing the OEM exhaust and catalytic converter on your RX is relatively easy but it does take some time and a couple of special tools if the catalytic converter really does need to be replaced. Lexus RX330 Catalytic Converter Customer Reviews. EPA Compliant - 48-State Canada EPA Tier 0 Tier 1 emission use.
P0430 LEXUS Meaning The Engine Control Module monitors the switching frequency ratio of heated oxygen sensors 1 front O2 sensor and heated oxygen sensors 2 rear O2 sensorA three way catalyst converter Manifold with high oxygen storage capacity will indicate a low switching frequency of heated oxygen sensor 2. Buy online and pick up in store or get fast free delivery on qualified orders. 2004 - 2006 Lexus RX330 Base 6 Cyl 33L.
The PCM keeps track of the fuel mixture ratio through oxygen sensors in the exhaust system that measure the amount of oxygen burned by the engine. Check engine VSA TRAC off. 1-17 of 17 Results.
Lexus RX330 Catalytic Converter Part Number. Where is bank 2 catalytic converter located on 2004 Lexus RX330. I have 2004 RX330 and same 3 lights on.
Keep your travel spirits high by installing AutoZones premium Lexus RX330 catalytic converter. Firewall Side Notes. NOT FOR SALE OR USE ON VEHICLES REGISTERED IN THE STATES OF CA CO ME OR NY.
2004 Lexus RX330 Catalytic Converter. 25052-20190 CONVERTER SUB-ASSY EXHAUST MANIFOLD NO2 Vehicle Specific Fits the following Lexus RX330 Years. RX330 WITH 33L FRONT MANIFOLD CONVERTER RADIATOR SIDE BANK 2 CONVERTER WILL WORK WITH FEDERAL EMISSION SYSTEMS ONLY.
2004-2006 STD 6 Cyl 33L 3MZFE. My 04 Lexus RX330s VSC and Check engine lights stay on constantly. Direct fit no cutting or welding required.
From uncontrollable and irritating jerking to nothing coming when you push on the gas problems with your crossover are enough to upset anyone. One mechanic told me try the sensors first another one told me to change the converters. Bank 1 To make sense of code P2096 it helps to have some background information.
This article applies to the Lexus RX 2007-2014. Bank 1 is closest to the fire wall so bank 2 is connected to the exhaust system from the grill side of the engine Mar 31 2017 Lexus Cars Trucks. OBD2 Code P0430 Lexus definition.
41643 Repair Shops and Dealers Call for Your Pricing 888-651-0770. Firewall Side Bank 1 The converter section contains premium load catalyst material with higher noble metal content for better emission performance. It is part of the vehicle emissions system.
For 2004-2006 Toyota Sienna Exhaust Manifold Catalytic Converter FWD Bank 2 33L Fits. P0430 LEXUS Description The Engine Control Module monitors the switching frequency ratio of heated oxygen sensors 1 front O2 sensor and heated oxygen sensors 2 rear O2 sensorA three way catalyst converter Manifold with high oxygen storage capacity will indicate a low switching frequency of heated oxygen sensor 2. The diagnostic is the same a problem with bank 1 and bank 2 catalytic converters.
WVE Click Info Button for AlternateOEM Part Numbers With 4 blade terminals. HONDA 2008 ACCORD 35L V6 Electrical-Switch Relay AC Compressor Relay.
 Could You Please Tell Me The Location Of The Compressor Clutch Relay On A 2002 Honda Accord 2dr 2 3 Also What Circuit
The AC compressor clutch is the power feed to your AC compressor.
2008 honda accord ac relay. Honda Accord 2008 2009 fuse box diagram Year of production. Videos are for Knowledge Entertainment purposes only. Due to factors beyond the control of RB The Mechanic it cannot guarantee against unauthorized modifi.
2008 2009 Engine compartment Number Ampere rating A Circuits Protected 1-11 100 Battery 1-12 100 Battery 1-2 40 Passengers Side Fuse Box 2-1 Not Used 2-2 40 ABSVSA 2-3 30 ABSVSA Motor 2-4 40 Passengers Side Fuse Box 2-5 Not. Replacing the AC compressor clutch relay switch. The 2008 Honda Accord has 12 problems reported for ac not working.
Buy a 2008 Honda Accord Relay at discount prices. 2008 Honda Accord Air Conditioning. Honda Accord 2008 Intermotor AC Clutch Relay by Standard.
Replace your faulty engine cooling. If your AC is not properly cooling the vehicle the AC clutch relay could be faulty. You can test the clutch relay for power with a test light.
Honda Accord 2008 Engine Cooling Fan Motor Relay by World Source One. This is a test. Install new relay for ac clutch.
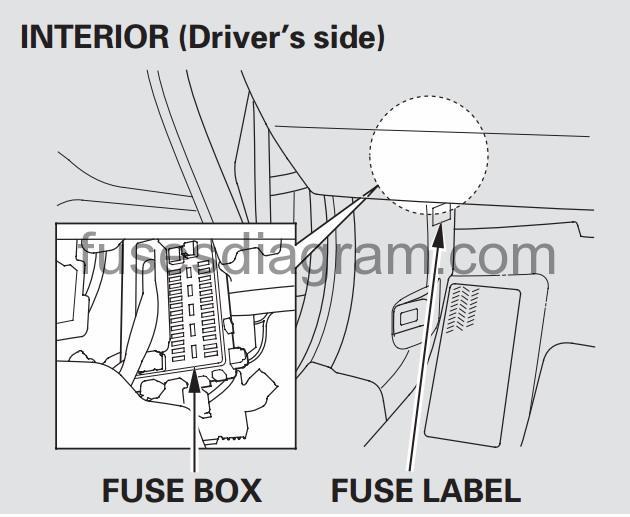
The drivers side interior fuse box is under the. AC Relay Micro Iso 4 Pin 12V G8HL-H71 for Honda Accord Civic Crosstour CR-V CR-Z Element Insight Odyssey Acura TL TSX MDX 39794-SDA-A03 39794-SDA-A05 RY1224-2 Pack 49 out of 5 stars 18 1199 11. 1-1 of 1 Results.
Fuse box in passenger compartment. Choose top quality brands API Forecast Four Seasons Genuine Santech Omega Envir. Honda Accord AC Clutch Relay Honda Accord AC Compressor Honda Accord AC Relay Connector Honda Accord AC Switch Honda Accord Repair Manual - Vehicle Show All Related Accessories Collision Body Parts and Hardware Motor Oil Transmission Fluid Test Scan and Specialty Tools Filters and PCV Seat Covers Seats and Accessories Show All.
When the AC relay fails it can cause a pressure relief valve to bleed or blow. Buy online and pick up in store or get fast free delivery on qualified orders. 6 6 Page 01 2008 Access our Honda Civic and Accord 2008 Fuse-Relay Boxes Repair Guide by creating an account or signing into your AutoZone Rewards account.
After turn car off and restart it will go back to not work. Fuses good relay is good replaced h read more. Increase the life of your vehicles engine by keeping your cooling system in top condition.
Having issue with ac not working compressor will engage when override. When the AC compressor relay has failed or is beginning to fail it will begin to display symptoms that indicate it may be time for it to be replaced. The AC compressor relay is no different then other electrical relays - its electrical contacts will eventually wear or burn out and the relay must be replaced.
Average repair cost is 690 at 44750 miles. 1-1 of 1 Results. Tech Standard Motor Products WSO.
No parts for vehicles in selected markets. For the Honda Accord 2003 2004 2005 2006 2007 2008 model year. The compressor is the unit that cools the air before it enters into the Hondas cabin.
2010 honda accord 35 I-vtec. For the Honda Accord USA and Europe 2008 2009 2010 2011 2012 model year. The under-hood fuse box is located near the back of the engine.
SMPs vision is to be the leading independent supplier to the automotive aftermarket providing the highest quality products competitive prices and the highest. 6 5 Page 01 2008 Fig. Shop AutoZone for 2008 Honda Accord AC Compressor Control Relay.
Amazon Link Generic Relay - httpsamznto2QhkK5SAmazon Link Genuine Honda - httpsamznto34wGRw9Amazon Link Toyota - httpsamznto34vPcA1Honda Eleme.
1992 Ford Explorer Service. Wiring Diagram For Cars within 2000 Ford Ranger Parts Diagram image size 775 X 587 px and to view image details please click the image.
 Ford Oem 92 94 Explorer Front Suspension Radius Arm Bushing F1tz3b203b Ebay
1992 Ford Cars Workshop Repair Service Manual.

Ford explorer front end diagram. And larger Superduty specific tie rod ends. You might be a specialist that intends to look for referrals or solve existing troubles. We had the Ford Explorer come in to the garage with a very phantom squeak noise from the front suspension after a brief road trip on some rough roads.
Ford Explorer 2010 Front Upper Non-Adjustable Control Arm and Ball Joint Assembly by Dorman Premium Chassis. So we attempted to obtain some. Five generations of the award-winning vehicle have been produced since that time.
This suspension control arm and ball joint assembly is a direct replacement for the original equipment. So we tried to uncover some great 2000 ford explorer parts diagram image for you. The Ford Explorer is one of the most known vehicles from the Ford line.
2008 Ford Explorer Axle Assembly Customer Reviews. While some believe the Dana 35 is the only axle used in the front of the Explorer it actually received a Dana 30 starting in 2002. If youve decided to replace a damaged front or rear bumper cover with a new one the good news is your vehicle really is going to look a whole lot better once its.
Motor Era offers service repair manuals for your Ford Explorer - DOWNLOAD your manual now. 800 x 600 px source. 248 just happens to be the equivalent in millimeters of 975.
Great producto best price. Ford Truck Technical Drawings And Schematics Section A Front size. Complete list of Ford Explorer auto service repair manuals.
Parts Ford Eng Asy 40L Partnumber F87Z6006Arm with 2000 Ford Explorer Parts Diagram image size 600 X 914 px and to view image details please click the image. Wheels Section B - Brake Assemblies and Components Hydraulic Brake System. FrontRear Axle Assemblies and Suspension Front Axle Rear Axle Driveshaft Suspension.
Need to see front end diagram for 2003 ford explorer front end diagram - Ford 2003 Explorer question. Or you are a trainee or perhaps even you who just need to know concerning 2003 Ford Explorer Front Suspension Diagram. Ford Truck Diagrams and Schematics HOME.
Truly we have been realized that 2000 ford ranger parts diagram is being one of the most popular field at this time. Right here are some of the leading drawings we receive from various sources we wish these pictures will be useful to you and with any luck extremely pertinent to just what you want regarding the Ford F 150 Front End Suspension Diagram is. Side Trim Screw GT without california special.
The Ford Explorer was initially produced as a mid-size SUV that debuted in 1991. Ford explorer suspension shouldnt rip your wallet apart. Ford Explorer Engine Parts Diagram.
Home Tech Articles Tutorials Diagrams and Schematics Index Back. Buy PartsW 12 Pc Front Suspension Kit for Ford Explorer 2001-2003 Explorer Sport Trac 2001-2005 Tie Rod Ends Sway Bars Lower Upper Ball Joints Gear Bellows Upper Control Arms 1 PIECE DESIGN ONLY. Shelby cobra GT 500.
Pro comp suspension 95 500b 5 inch rear lift block. 1991-2001 Ford Explorer The Ford Explorer Sport still used the solid rear 88 until 2003 5950-Inch WMS to WMS 1996-2002 Ford Expedition. Ford explorer front suspension diagram.
It is an SUV that provides spacious seating for up to six passengers. About Press Copyright Contact us Creators Advertise Developers Terms Privacy Policy Safety How YouTube works Test new features Press Copyright Contact us Creators. Modifications to the front end of the vehicle including frame bumper front end body structure and non-Ford tow hooks may effect the performance of the airbag sensors increasing the risk of injury.
Do not modify the front end of the vehicle with anything other than authorized Ford accessories for your vehicle. I buyed 3 webs ago great product better price i recomend. 41 51 nm front stabilizer bar link to lower control arm nut 12 16 ft.
128 157 nm front stabilizer bar bracket nuts and bolts 30 38 ft. Actually we also have been realized that 2000 ford explorer parts diagram is being one of the most popular subject at this time. Ford Explorer service repair manuals.
The Ford Explorer received the Dana 35 SLA often referred to as a Dana 35 IFS in 1995 and used this axle until 2001. There is third row seating in some of the options as well as both back seats being able to fold down for added space in the back of the vehicle without needing space for everyone to sit. Searching for details regarding 2003 Ford Explorer Front Suspension Diagram.
From 2000 on the Ford Dana 60 front axle is also known as the Model 60F2000 or the 248M. Front Driver Side Axle Assembly - New Manufacturer 2203N Reviews Questions Answers. DSS Front Driver Side Axle Assembly - New.
You are right here. PARTS LIST FORD Explorer 1991 1992 1993 1994.
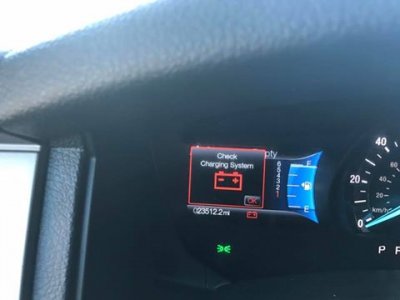
Tried installing a second new alternator just in case but the check charging system message is still there. Hi I have a 2007 Ford Explorer the other day my check charging system light come on.
 2016 Expedition El Check Charging System Warnings 2 Alternators Later Ford Expedition Forum
The check charging system message comes on and goes off while driving.

Check charging system ford explorer. There seems to be no rhyme or reason for when it goes off does it hot cold good weather. Have your mechanic test the voltage coming from your alternator. Could it be compressor or alternator problem.
Have your charging system tested immediately this should test both the battery and the alternator as both can cause this problem. The charging system should also be checked if the engine cranks slowly or if dim headlights brighten upon acceleration. Check charging system light 7 Answers.
Check Charging System message came on and shortly after that air conditioner started blowing warm air. I cant find a mega fuse box or a mega fuse and thats the problem and I checked all my fuses underneath the hood in the capsule and all seem fine. Alternator just went out on it.
My 2005 ford explorer check charging system warning light if charging light is on w engine runningthe fault could be the alternator or another component of the charging systemremove clean and tighten battery post connections to check for alternator outputuse a volt meter or multi-tester set to 50 Volts DCw tester on battery terminals it should read 12 volts W engine off13 to. My car has an automatic transmission. Replaced all belts March 2011.
If u had found a solution kindly help me out with this. I took it aitozone they tested it said my alternater was bad so I change alt and replaced battery. Car still keeps shutting off and saying check charging system.
I bought the truck used in April 2008 within the first week had to replace the battery. August 2010 replaced battery again. My 2005 ford explorer check charging system warning light if charging light is on w engine runningthe fault could be the alternator or another component of the charging systemremove clean and tighten battery post connections to check for alternator outputuse a volt meter or multi-tester set to 50 Volts DCw tester on battery terminals it should read 12 volts W engine off13 to.
Ford Explorer ST Forum is the premier Ford Explorer ST community. Car runs fine but my ccheck charging system light is still on. April 2009 had to replace the alternator.
If the voltage is low your mechanic will likely replace your weak alternator with a new one. The engine turns over easily and normally but the engine wont start. Its usually easy to know when the charging system isnt generating enough power -- just look at the warning light or gauge.
Share your favorite Ford Explorer ST photos as well as engage in discussions with fellow Ford Explorer ST owners on our message board. Battery problems - Your batterycheck charging system light could be coming on because your battery is low and needs replacing. Do not turn off the engine.
After all was put back together car ran until check charging system light came on and all my electrical shut off as I. If the light or gauge is not working the battery will discharge to alert you of a potential problem. My check charging system warning keeps beeping at me.
My explorer 06 while on the road suddenly the engine dies and check charging system comes on and after waiting about 15seconds and turning the ignition the engine starts again as nothing happened. Answered on April 10 2020 if you get the check charging system message in the ford explorer you may have a problem with a bad alternator a bad battery a loose belt loose wire or other electrical issues. We offer one of the largest collection of Ford Explorer ST related news gallery and technical articles.
My car has 187000 miles. 2002 ford explorer message center indicates check charging system message as I try to start the engine. Replaced it with a new one but the red battery light stays on and the message center is still showing the check charging system message.
The battery is 1 year. I change my alternator in my 2007 Ford Explorer. Had a customer come in complaining with the same symptoms on a 2007 Ford Explorer XLT 40L.
2017 Ford Explorer Check Charging System Now message 2 Answers. Two auto shops checked the battery and alternator and said they both are working correctly but the message still comes on while driving. Check charging system message when trying to start engine 1 Answer.
So far nothing is making the warning beeps go away. Do not use any electrical components power windows. Jill answered on October 6 2020.
2003 Expedition with about 71000 miles on it. I have a 2006 ford 500 and recently had to replace my alternator and battery.
This is usually the result of a clogged water filter or restricted water supply. The thermistor monitors the refrigerator temperature and sends the temperature reading to the control board.

When it sounds the units display will tell you that the door is open so you know which alarm is beeping.

Frigidaire refrigerator error code h1. The water supply line is kinked. The error H1 youre getting just means that the refrigerator thinks that the freezer and refrigerator temperatures are too warm. The FRS26ZNH refrigerator has an automatic ice maker.
Unplug the refrigerator and check the evaporator fan wire harness connection in the freezer. Reconnect the wire harness plug if its loose. Frigidaire Model FFHS2622MBQA.
Note that the display panel on a Frigidaire refrigerator is a touch screen. Frigidaire Refrigerator Unit Flashing. Unplug the refrigerator for 5 minutes.
With everything being off and unplugging and plugging back up corrects the issue then this would most likely be a control board issue. I have been away from home for several months military so my home has been unoccupied. The fridge temperature is at 36 and the freezer at 1 with no temperature issues there but still showing H1 on both on the control board.
Before I call my property managers maintenance department as ice maker issues are specifically my responsibility according to my lease Florida Im trying to figure out what is going wrong here. Just the fridge side this time but not the freezer side. Replace the water filter and if the condition still occurs check for a Saddle Valve water valve not turned on all the way or kinked water supply line.
Is this a good question. I have a Frigidaire Side by Side Refrigerator that was purchased approximately 10 years ago. The following steps will help you reset the defrost timer of a Frigidaire refrigerator.
If correct replace the thermistor. Abour six months ago the lower left side under the fr read more. Menos de 1 minuto Solution.
How to Reset a Frigidaire Refrigerator Defrost Timer. Unplug the appliance and allow it to rest for 30 seconds before plugging it back in. This generally occurs when the ice maker does not get enough water.
Frigidaire refrigerator h1 code The H1 fault code indicates that the temperature in the refrigerator and freezer is higher than it should be. Check wiring between a thermistor and board. Add a comment.
To reset the alarm on the upright freezer check to make sure the door is closed and that the food is frozen. Pro Tech Toolkit. Here is the picture of the frost pattern attachment 39494355_082520.
Error code H1 indicates that a freezer sensor shorted in freezer display. H means that the refrigerator thinks the heater is bad. If the wire harness connection in the freezer is okay check the evaporator fan.
Frigidaire refrigerator Error code H1 means the refrigerator thinks that the freezer and refrigerator temperatures are too warm. ANSWER Jamie The H1 that you are seeing if it is in the freezer means that the temp is above 26 degrees in refrigerator window would mean refrigerator is above 55. You only need to touch the glass lightly.
The code may appear when the device has just been turned on and has not cooled down yet. The temperatures are likely too warm just because the unit was new and came room temperature. Click to see full answer.
Youll see the silver evaporator coils with the evaporator fan above it. If the wire harness connection in the freezer is okay check the evaporator fan wire connections to the electronic control board brownwhite bluewhite and yellowwhite wires on J4A and redwhite wire on J4B. You wont cook a tasty dinner if your Maytag oven is not heating.
What does the h code mean on my refrigerator 2013 Frigidaire side by side my refrigerator isnt getting cold enough on the fridge side. Close both doors gently. Yes No Score 0.
Do not apply force. Add a comment. Our videos have been produced reviewed and tested by our factory certified technicians with over 30 years of infield experience.
View the answer I have this problem too Subscribed to new answers. With a growing library of free repair videos we have the video you need to complete your next repair with confidence. You can get the best discount of up to 50 off.
Youll need to pull everything out of the freezer and remove the back panel inside the freezer. When the Frigidaire upright freezer keeps beeping it could be due to a high temperature. Plug it back in and it should clear the H1 error code.
KP-53V85 - 53 Color Rear Video Projector. I have a sony rear projection tv that I have recently gotten from a friend.
 How To Adjust A Projection Tv It Still Works
Sony projection tv the colors are out of alignment is it junk.
Sony projection tv color alignment. If it is a projection TV consider replacing the lamp. The convergence markers do not respond to the customer convergence adjustment. Similar controls may be found on the projection TV console.
My sony rear projection tv now has a yellow and blue shadow on the screen - Answered by a verified TV Technician. It sounds like your television has a convergence problem. Does this mean that the tv is junk.
Thank you for purchasing the Sony Color Rear Video Projection TV. Instructions in this manual are written for the remote control. Im ignorant when it comes to projection displays.
A front-projection television uses a projector that is separate from the screen and the projector is placed in front of the screen. It needs to be calibrated and particularly to have the video guns alignedRPCRTs have probably the best picture of any type of television on the market but go out of alignment quite easily. Im trying to figure out what it would cost to replace the projector should it fail.
View and Download Sony KDF-50E2000 operating instructions manual online. It sounds like the normal thing with a rear-projection CRT television. Sony KP-53V85 - 53 Color Rear Video Projector Manuals Manuals and User Guides for Sony KP-53V85 - 53 Color Rear Video Projector.
The image looks amazing after the 10 minute warm-up period. Each video input should be properly calibrated whenever the television is moved. If I let the tv sit for about 10 minutes it just pops into place.
The alignment of the block will affect the. Follow the steps below to access the TV menu. It was fully working and appeared to have no issues.
The projected image should be a minimum of 60 inches 152 cm diagonally and the projection surface should not be colored or textured otherwise the adjustment grids will be difficult to align. Bravia kdf-50e2010 Bravia kdf-50e2000. I have also realigned the lights by hand.
You can adjust the following picture settings on your TV to help enhance your viewing experience. I have a sony projection tv the colors are off and I cansee rgb around letters and objects. KDF-50E2000 projection tv pdf manual download.
The availability of these functions depend on the model of your TV. Thank you for purchasing the Sony Color Rear Video Projection TV. Sony notes that for projection TVs a dim or dark picture may be an indication that the lamp needs to be replaced.
This device was manufactured in 2003 in Mexico. View programming from a different source such as a DVD player or VCR to see if the issue is being caused by the device providing the signal to the TV. If the projection TV is transported directly from a cold to a warm location or if the room temperature changes suddenly the picture may be blurred or show poor color.
Your projection TV has a convergence problem. NOTE The simulator provides theoretical values based on entered dimensions. The setup of a rear-projection television is in some ways similar to that of a traditional television.
A service manual is generally not needed to perform the repair. The tool contains an interactive simulation of throw distances for each kind of lens and available lens shift range. In this case please wait a few hours to let the moisture evaporate before turning on the projection TV.
This manual is for models KP-43T75 KP-48S75 KP-53S75 KP-53N77 KP-61S75. Description and advice on problems with defective Sony LCD rear-projection TV sets. Im looking at the prices of parts for this tv and the only thing Ive been able to find are the lamps.
We have 3 Sony KP-53V85 - 53 Color Rear Video Projector manuals available for free PDF download. Thus it is likely that the TV will fail again with the same problem after a similar or somewhat extended level of usage. The only problem Ive found so far is that the colors arent converged upon turning the tv on.
They will also druft out of alignment over time. Im assuming the projector itself is a separate part from the lamp i mentioned I replaced. The Projection Simulator tool provides easy simulation for Sony projector installers and system integrators.
It happens when you see double. On the supplied TV remote press the HOME button. Avoid operating the projection TV at temperature below 5C 41F.
The convergence circuit pushes and pulls the colors into alignment so they converge at the same point. Different aspect ratios between screen and projection image is also selectable. Answer 1 of 5.
If the circuit fails the colors separate like youve described and the picture sometimes warps or bows at the edges. KP-51WS510Large rear-projection TV found on a curb. You can try and manually align the grid using your remote.
If you have a remote control you can try to fix it using that. So the replacement panels are often from the red or green color channel in another TV. Model KP-53S75 is used for illustration purposes.
Allow your projector to warm up for at least 10 to 15 minutes and make sure the image is in focus before you use the Panel Alignment feature. Learn how to properly align your projector and how to use its lens shift capability. Furthermore the center cros read more.
I need help in diagnosing a convergence failure of a Sony rear projection CRT TV KP-46WT510. Not even the flash focus button will correct the problem. There should be a grid-like structure that appears on your television screen over the program you are watching.
The projector uses a bright beam of light and a lens system to project the image to a much larger size.
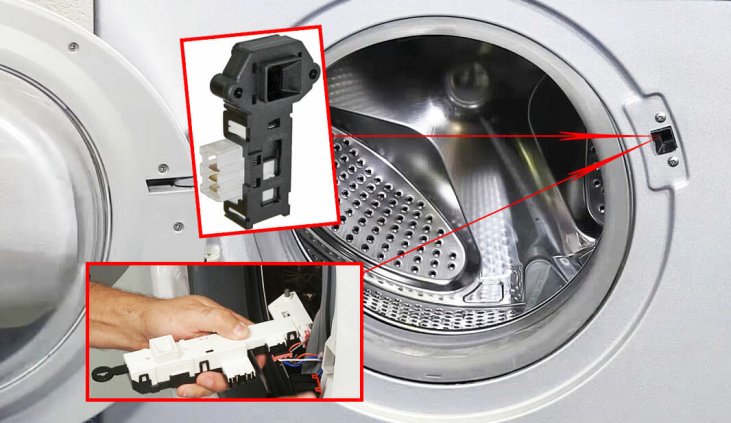
Wait and see if it drains out by itself. Look for the lid lock switch on the underside of the top panel and where it fits into the appliance.
 Samsung Washer Error Code Dc Door Causes How Fix Problem
Turn the washing machine off and unplug it.
Samsung washing machine door locked. The most common causes of a locked washing machine door are that the child lock has been engaged or that the cycle hasnt been allowed to finish. Samsung washer door is locked. When water is no longer in the washer reset the washer by pressing the ONOFF or STARTPAUSE button.
My washing machine cycle came to an end. Then wait for a minute to pass and you can then unlock the door. During the entire wash cycle the Samsung washing machine locks the door to prevent it from being opened and interrupting or stopping the cycle.
After 3 minutes it is supposed to unlock but it didnt. In this video Mat shows you how to open a stuck washing machine door in different waysIf you need spares for any washing machine brand or model check out t. The washer is too hot.
Locate the retaining tabs andor screws that hold the top horizontal panel down. It may take a few minutes for the washing machine to cool down and for the lock to release. Panic is worse if the tank is full of water and an open door threatens a real flood.
When it is active you wont be able to select any functions or open the door until it is switched off. If the washer is off turn it on and wait until the door unlocks. The washer should make a clicking sound and the door should unlock.
I turned the power off on the wall and it still wouldnt unlock. Water remains in the washer. On top load washers that lost power during a cycle it will take up to 5 minutes for the washer to unlock and resume normal operation.
Try pulling the handle again to see if the door opens. Normally waiting for the cycle to end is all you need to do to unlock the door or turn your washer on if its off. The washing machine will not tumble or spin unless the door is closed for your safety.
It has drained all the water out so thats not a problem. Open the door during cycle The door will automatically be locked for safety reasons when the tub is filled with water. It feels like the lock at the top of the door is not egaged properly - I cant seem to either shut it better or open it.
Also until the washing machine drains the water completely and the door cannot be opened. Your washer door locks to prevent water from coming out especially for front load models. Detailed descriptions of each cause and problems with the elimination of Door error.
The computer will reset the last program and open the hatch. Any advice on getting the door open so that I can look. Child Lock also will lock the door on some models like front loaders.
How to unlock Samsung washing machine If the appliance has refuses to open the door for more than 5 minutes you need to perform an emergency reboot and unplug the machine for half an hour. Sometimes its good to lock. If the door remains locked when the cycle is finished push StartPause to clear the lock.
I have Samsung washing machine the red key light on so i cant open the door at the. If pausing the cycle doesnt unlock the door turn the machine off. Then unplug the machine and wait 5-10 minutes.
Depending on your model there may be a sequence of buttons to press to engage the child lock. Until the washing machine drains water completely the door cannot be opened. The washing machine door will be locked when it detects water in the unit.
The door may be locked for two reasons. The door of my Ecobubble machine seems to be locked shut. How to open a Samsung washing machine if it is locked Everyone is so used to regularly using a washing machine that a suddenly locked door becomes a big tragedy and fraught with broken plans.
Washing machine door wont unlock. The door locked sign is on and I can see a dC code on the display. How to Bypass a Washing Machine Lid Lock Turn off the washer and unplug the appliance.
This is the most common solution for top loaders. Use the Spin mode will if there is water in the drum. The reasons for the appearance in the Samsung washer error code Door.
A how to video instruction guide on how to activate or deactivate the child lock feature on a Samsung Ecobubble Washing Machine.
47 out of 5 stars 8954. Maybe it will fix.

Badger 5 garbage disposal pdf manual download.

Model 5 75 garbage disposal. Is there anything that I can do besides buying a new one A. As part of its wide-ranging line of garbage disposals Insinkerator positions the 12-horsepower Badger 5 as a basic household model that focuses on consistent performance and durability. Hi I have an emerson garbage disposal model 5-75 model XXXXX 72645378 I reset the botton at the bottom but only I hear is that humming sound.
525 x 525 x 1275 050 2800 Check price. Since garbage disposals are mostly metal it is better to think salvage rather than the landfill. InSinkErator Garbage Disposal Badger 5 12 HP Continuous FeedBlack.
To top it off Badger 5 offers a 2-year We Come to You In-Home Service. This garbage disposal also features a 12 HP motor that rapidly grinds food waste for easy rinsing down the drain and galvanized steel-grind components. Run cold water and turn on the disposer to make sure the disposer is empty and then turn the disposer off.
The line comes in three models each with a compact design allowing you to save space. I do not see where I can open the unit. It sounded like the motor was going but the blades were not turning.
At first I was ambivalent. The InSinkErator badger 5 garbage disposal is assembled in the USA and carries a We Come To You 3-year in-home limited warranty that covers parts and labor for added peace of mind Specifications Series Name. The InSinkErator Badger 5 12 HP Continuous Feed Garbage Disposal features a quick-mounting system that allows for easy installation or replacement of most disposers.
Its a cost-effective odor-free device that can help you with even the toughest clean ups. InSinkErator Food Waste Disposers. The disposal simply made this humming noise when it was on.
I have reset the unit and checked for any thing that might be causing the motor to seize. Whirlaway 291 Our Compact Choice 61 x 59 x 137. The market is filled up with a variety of model 5 75 garbage disposal but the best model 5 75 garbage disposal that suits your needs can be a bit difficult to find.
But just like any other garbage disposal unit out there you have to expect certain problems to pop up eventually. The InSinkErator Badger 5 with power cord 12 HP Continuous Feed Garbage Disposal features a Quick Lock mounting system that allows for easy installation or replacement of most disposers. My garbage disposer smells.
This garburator also features a 12 HP motor that rapidly grinds food waste for easy rinsing down the drain and galvanized steel-grind components. InSinkErator Badger 5 Manuals Manuals and User Guides for InSinkErator Badger 5. From the powerful induction motors with cutting edge grind technologies to the top-of-the-line sound reducing technologies the Evolution Select Continuous Feed Garbage Disposal delivers exceptional.
Disposa Fresh is a non-toxic mixture of natural citrus oils and gelatin. The InSinkErator Badger 5 12 HP Continuous Feed Garbage Disposal features a Quick Lock mounting system that allows for easy installation or replacement of most disposers. 1 batch feed model and 3 models with continuous feed.
Find out where to take your old disposer check with Earth911 and check under metals for your local zip code. InSinkErator Garbage Disposal Badger 5 12 HP Continuous FeedBlack Plumbcraft 7027450 Garbage Disposal Installation Kit 50 out of 5 stars 2 12599 125. View and Download InSinkErator Badger 5 specifications online.
This garbage disposal also features a 12 HP motor that rapidly grinds food. A garbage disposal is a second trash can one for all the gunk that you dont want sitting in a wastebasket stinking up your kitchen until its ready to be emptied. Evolution Select 58 HP Continuous Feed Garbage Disposal Evolution Series garbage disposals are the Evolution Series garbage disposals are the worlds most advanced food garbage disposals.
The Badger 5 series of garbage disposal units from InSinkErator are a reliable and functional choice when youre looking to save on costs. KitchenAid produces 4 different types of garbage disposal. I took the garbage disposal off and drained it out.
I have a Model 5-75 insinkerator garbage disposal that is hard wired to a light switch. More Buying Choices 9108 61 used new offers InSinkErator Badger 5 12 HP Food Waste Disposer and Power Cord Kit. Depending on the model our Standard Series disposals feature 1-year to 3-year limited warranties.
This process recycles a variety of items including copper aluminum steel and more. The quickest and easiest way is to use the Disposer Freshener we offer. Their residential garbage disposer motor power ranges from 12 HP to 1 HP with 34 horsepower model.
My Badger 5 Plus garbage disposal seized up a few weeks ago after some mango peels made their way down into the drain. Amazons Choice for insinkerator model 5-75. But if you leave it in the hands of experts like us then you can be assured that you will land up with a reliable and trusted model 5 75 garbage disposal.
When I flip the switch to run the unit there is a sound as if the motor is engage but does not spin. Manual Installation Care And Use Manual Owners Manual Specifications. We have 8 InSinkErator Badger 5 manuals available for free PDF download.
Inside 2000 Ford F150 Fuse Panel image size 448 X 576 px and to view image details please click the image. Apr 5 2019 - Fuse box diagram location and assignment of electrical fuses and relays for Ford F-150 1997 1998 1999 2000 2001 2002 2003.
 2000 Ford F 150 Fuses And Fuse Box Layout Ricks Free Auto Repair Advice Ricks Free Auto Repair Advice Automotive Repair Tips And How To
Here is a picture gallery about 2000 ford f150 fuse panel complete with the description of the image please find the image you need.

2000 ford f150 fuse panel. More about Ford F-150 fuses see our website. Ford F-150 1997 2004 fuse box diagram. The 2000 Ford F-150 has 2 different fuse boxes.
The underhood fuse box is call the Battery Junction Box while the one under the dash is called the Central Junction Box. The 2000 Ford F-150 has two fuse boxes one under the hood and one under the dash. The 1997 97 1998 98 1999 99 2000 00 2001 01 2002 02 2003 03 1997-2003 Ford F150 Fuse Box fuse panel is located under the hood on the drivers side right behind the air filter.
1997 1998 1999 2000 2001 2002 2003 2004. Ford Fuse Box DiagramWelcome To My Site. Automotive Wiring Diagrams inside 2010 Ford F150 Fuse Box by admin Through the thousands of photos on the web in relation to 2010 ford f150 fuse box we picks the top choices using best quality exclusively for you and this pictures is actually one among images libraries within our greatest images gallery in relation to 2010 Ford F150 Fuse Box.
For a detailed list of all fuses. 2000 ford f150 fuse box - welcome to my web site this article will discuss about 2000 ford f150 fuse box. Passenger compartment fuse panel Ford F150 1997-2003.
Passenger compartment fuse panel diagram. Passenger compartment fuse panel diagram. To remove a fuse use the fuse puller tool provided on the fuse panel cover.
Fuse box diagram location and assignment of electrical fuses and relays for Ford F-150 1997 1998 1999 2000 2001 2002 2003. Once the panel is removed it will expose the fuse box spare fuses and relays. Fuse box diagram fuse layout location and assignment of fuses and relays Ford F150 2004 2005 2006 2007 2008.
The video above shows how to replace blown fuses in the interior fuse box of your 2000 Ford F-150 in addition to the fuse panel diagram location. To locate and identify your blown fuse see below. Here is a picture gallery about 2005 ford f150 fuse panel location complete with the description of the image please find the image you need.
RADIO Fuse 8 5A Interior Fuse Box Cigarette Lighter Fuse 3 20A Interior Fuse Box. Fuses are key to your trucks electrical system and to keeping. Here is everything you need to know about fuses in your Ford F-150 truck.
2000 Ford F-150 Fuses and Fuse Box Layout 2000 Ford F-150 Fuses and Fuse Box Layout 2000 Ford F-150 Fuses and Fuse Box Layout for each fuse box. By Pizzaman711 - October 30 2014 This article applies to the Ford F-150 2004-2014. 2000 f150 fuse box diagram welcome to my website this post will review concerning 2000 f150 fuse box diagram.
Passenger Compartment Fuse Panel. 1 of the diagrams list the fuse in the fuse box and the second diagram does not sh read. Remove the panel cover to access the fuses.
The fuse panel is located to the left of the steering wheel near the brake pedal. Whenever you run into an electrical problem the fuse box is the first place to look. Power distribution box diagram Ford F-150 fuse box diagrams change across years pick the right year of your vehicle.
I checked all the fuses in the box and checked the manual. Commonly blown Ford F150 fuses. Below is the passenger compartment fuse panel diagram for 1997-2004 Ford F-150 pickup trucks.
Electrical components such as your map light radio heated seats high beams power windows all have fuses and if they suddenly stop working chances are you have a fuse that has blown out. 2004-2014 Ford F150 Fuse Box Diagram Id Location 2004 04 2005 05 pertaining to 2005 Ford F150 Fuse Panel Location image size 800 X 505 px and to view image details please click the image. Need A Fuse Box Diagramlegend - Ford F150 Forum -.
Fuse and relay location. Identifying and legend fuse box Ford F-150 2009-2013. 2000 Ford F150 Fuse Box Diagram.
We have accumulated many pictures with any luck this photo works for you and also assist you in discovering the answer you are looking for. The 2000 ford f 150 has 2 different fuse boxes. The fuse panel is located below and to the left of the steering wheel by the brake pedal.
Updates Downloads StreetPilot c340. Show Description To upgrade your old Garmin Devices you need to download Garmin MapSource from Garmin website from the link below the PC Install-able version of your desired Map from Garmin.
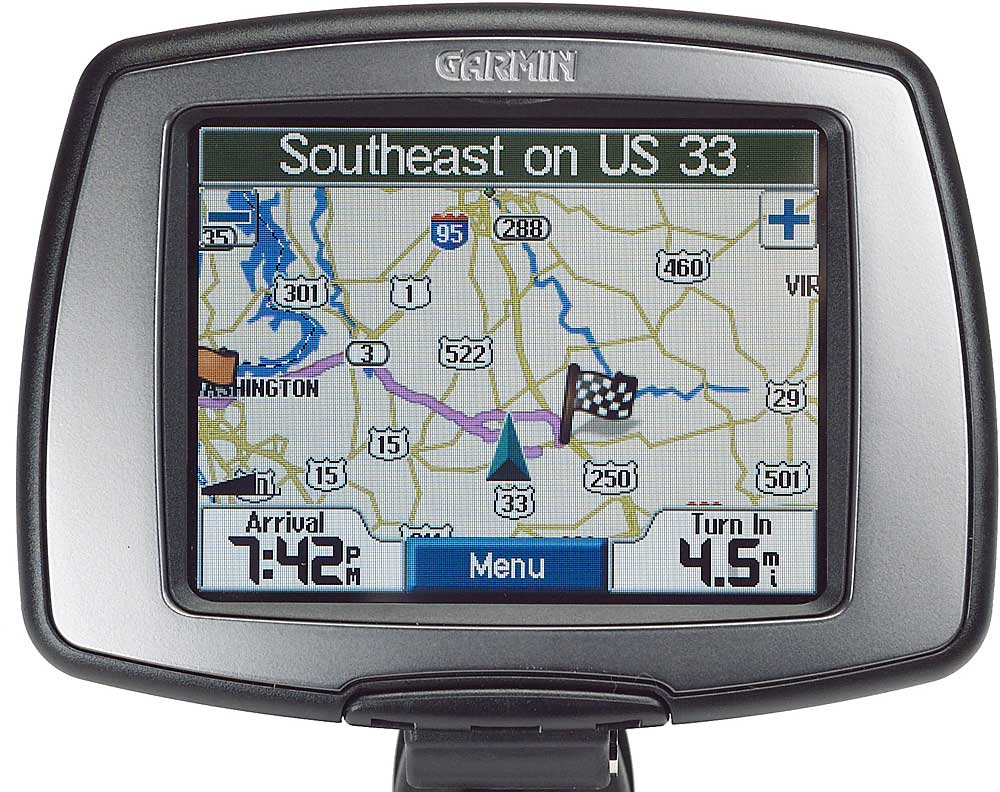 Garmin Streetpilot C340 Portable Car Navigation System At Crutchfield
Automotive golf marine aviation outdoor and cycling.

Garmin streetpilot c340 map update. This software should only be uploaded to the unit for which it is intended. In Europe contact Garmin Europe Ltd. Upgrading may cause user settings and favorites to be lost.
Get the latest street maps and points of interest for all Garmin product categories. I just went online with my Nuvi 255W to check for any updates and was surprised to see there is another free update available for her C340. These upgrades are specific to the specific GPS units and software versions listed.
I registered it under My Garmin and there was a free map update available which I installed for her. Use Garmin Express to keep your device software up to date. Also check Updates link to see if an update to the c340s internal software is available.
If you register your unit you will receive notification of software and map updates. Garmin StreetPilot C330 In order to update your GPS device. Improve handling of the situation where overlapping map data is present on the device.
This download area offers free firmware upgrades for select Garmin units. 559 MB View system requirements. Whether you choose the c340 or c330 with preloaded maps or the c320 or c310 with SD card their intuitive touch screen operation and big displays make them easy to use.
Check the Garmin Web site at map software is available. PPENDIX Updating the c340 Software and Map Data Garmin periodically updates its software and map data. POI Loader for Windows Ver.
Automotive OEM Solutions Blog Careers Garmin Express RV OEM Solutions Shop all sales. Once the operating system is installed - then go to this web page for maps - you will have to purchase new maps unless your unit came with unlimited updates free maps are only good for the first 90 days. GARMIN StreetPilot i3 i5 c320 c330 c340 c530 c550 c580 2720 2730 2820.
Change History Changes made from version 600 to 610. In the USA contact Garmin Product Support by phone at 9133978200 or 8008001020 MondayFriday 8 AM5 PM Central Time. StreetPilot c340 Updates Downloads.
Use Garmin Express to install this file. Map Updates Purchase New Maps In-Dash Maps. In this video wll see how to update and backup your Garmin GPS to 2017 maps for freeGarmin Map Updates 2017Link.
Updates Downloads StreetPilot c340 Update Unit Software with Garmin Express. Many users are faced Garmin StreetPilot c340 when they traveling with the Garmin device In case you are one of these and suffer due to those issues dont w. 273 as of Nov 07.
The Web Updater Program should install the Garmin communicator - if not then you will need to download it also for the map updates. Updates Downloads StreetPilot c340 Update Unit Software with Garmin Express. This was last June.
To upgrade your old Garmin Devices you need to download Garmin MapSource from Garmin website from the link below the PC Install-able version of your desired. Garmin StreetPilot c330 Portable GPS Navigator Discontinued by to get one and you get it on or after the new maps release date the upgrade would be free. How To Update Maps on Garmin Street Pilot Many users are faced Garmin StreetPilot c340 when they traveling with the Garmin device In case you are one of these and suffer due to those issues dont w.
Map Updates Purchase New Maps In-Dash Maps. Contact Garmin if you have any questions or if you should encounter any difficulty while using your StreetPilot c340. Use Garmin Express to keep your device software up to date.
The StreetPilot c340 leads the portable affordable c300 series with text to speech capability and optional traffic alerts. GPS Tune-up GPS battery replacement GPS map updates GPS repairs. StreetPilot c340 region file only software version 610.
Garmin Support Center is where you will find answers to frequently asked questions and resources to help with all of your Garmin products. How to update a 15 Year old Garmin StreetPilot C320 C330 C340 Nuvi 350 GPS to the Newest 2020 Maps. If still havent got it you can get it now filling the form you see on this page.
If this software is uploaded to a device other than that for which it is designed you will not be able to. As of July 16 2008. Garmin StreetPilot C330 with the latest update follow next instructions.